Showing posts with label Tips and Tricks. Show all posts

Search For Hidden Or System Files In Windows

The Search companion in Windows XP searches for hidden and system files differently than in earlier versions of Windows. This guide describes how to search for hidden or system files in Windows XP.
Search for Hidden or System Files By default, the Search companion does not search for hidden or system files. Because of this, you may be unable to find files, even though they exist on the drive.
To search for hidden or system files in Windows XP:
Click Start, click Search, click All files and folders, and then click More advanced options.

Click to select the Search system folders and Search hidden files and folders check boxes.

NOTE: You do not need to configure your computer to show hidden files in the Folder Options dialog box in Windows Explorer to find files with either the hidden or system attributes, but you need to configure your computer not to hide protected operating system files to find files with both the hidden and system attributes. Search Companion shares the Hide protected operating system files option (which hides files with both the system and hidden attributes) with the Folder Options dialog box Windows Explorer.

Change the Name of Recycle Bin

To change the name of the Recycle Bin desktop icon, open Regedit and go to:

HKEY_CLASSES_ROOT/CLSID/{645FF040-5081-101B-9F08-00AA002F954E}

and change the name "Recycle Bin" to whatever you want 

(don't type any quotes).

Connect Your Home Computer From Remote Location

Using the Remote Desktop feature, you can connect your home computer (host) from any other remote computer (client) and can access all computer resources (installed programs, data and any network resources). You can run any computer application on the remote computer as you were running actually sitting in front of home computer.

Follow the given steps to configure your computer to connect remote computer:
To use this feature, you will need to be logged into your computer with administrative rights.
Full To perform this task, first make sure your both computers are connected to the internet.
First you have to configure the host computer that allows the users to connect it remotely. On the host computer, right click on "My computer" and click on Properties option.

Under the Remote tab, select the option "Allow users to connect remotely to this computer" and click Ok button.

Now get the IP address of host computer (type the "ipconfig /all" on the command prompt of host computer to find IP address).
Now make a connection on remote or client computer, click on Start button, go to All Programs> Accessories, and Communications, then click on Remote Desktop Connection, option. A Remote Desktop Connection, dialog box will appear.

Click on Options button for detail configuration, under the General tab, type the IP address of host computer in the Computer box and also type username and password of host computer then click on Connect button to make a connection to remote computer.

If your username and password is correct then a remote desktop windows will appear.

Backup your computer installed drivers

You can easily create the backup of your computer installed drivers (just the particular or all drivers) and use it to troubleshoot any driver problems. This backup will be very useful when you will format your computer window due to any reason. There is no need to search the drivers from internet or drivers CD, just import the driver backup and within five minute, you will complete the driver installation process. You can move this backup from one computer to other computer for installation.

To complete the all process, we will use a simple tool called DriverMax. Using this tool, we can easily export the backup of any specific or all drivers and then import it for reinstallation later or elsewhere. You can free download (with free registration code) this tool for windows XP and Vista also. Download it and run the easy setup.

After Installation launch DriverMax, the first screen you will get with title "DriverMax - Version" and options "Export drivers, Import drivers and Installed drivers report". Just click on "Export Driver" option to start backup process.
Now after welcome screen, system will take few seconds to create the list of all installed drivers and then show you all installed drivers list.
Here you can select any specific device driver or click on "Select all" button to create the backup of entire installed drivers.
Press the Next button and in next screen you can select the export type (simple backup or in zip format) and then choose the backup location (always choose drive other than C drive).
Again press the Next and system will take some time (depend upon the size of your drivers) to finish exporting the selected drivers.
Click the "Open extraction folder button" to view the backup files or press Close button to finish it.
Now you can use this backup files (using import option) to restore drivers backup or move to any other computer.

Increase/decrease size of Recycle bin

You can increase and decrease the size of the Recycle Bin. There are some size limitations with Recycle Bin size, its default size is equivalent to 10 percent of the drive size. But if you delete a larger size file accidentally, you can retrieve this file from Recycle Bin that is why you should set the maximum storage size of the Recycle Bin.

  • First Right click on the Recycle Bin icon on the Desktop of your computer then go to Properties.
  • Adjust the slider bar in the center of the screen from 10% to maximum size as you want.
  • Then click OK button to save your new sitting and exit the Recycle Bin Properties Window.
  • After change reboot your computer to have Windows fully initiate the necessary changes to your system.

Repair your Windows Operating System Online with Reimage

Most Windows XP users will notice their system seems to get slower and slower compared to when they first installed the operating system. As the time passes, we installed a lot of programs and stored a lot of files, causing the operating system used more system resources and makes your computer slower. Besides that, with the emergence of internet and file sharing, users can unknowingly install what is known as spyware or malware. These malwares, spywares and viruses damaging your operating system and degrading its health.


Reimage

What is Reimage?
Reimage is a web-based service runs via ActiveX that repairs damaged Windows XP systems so that your operating system will run like it first installed. Reimage repairs Windows XP PCs remotely over the network or internet and specialized in Windows XP PCs that won’t reboot.
Reimage performs its works by applying a set of predefined actions according to the problem in the XP systems. By referencing with over 4 million registry and components repository, Reimage looking for components or objects that are missing, new objects or changed by viruses, malware or other malicious software. Then, Reimage will replace the missing objects with the repository databases and restore the services or components to its original state. For the new components or objects, Reimage will disable them so they can’t do harm anymore. Unlike built-in Windows XP system restore, Reimage doesn’t affect user data or applications on the operating system.
Here are some features of Reimage:
  1. Reduce repair time – Save time because Reimage is easy to use and there is no need to call your technician each time you have PC problems.
  2. Optimize your Windows XP machine – Reimage will provide diagnosis for your PC, including processor usage, memory usage, hard disk usage, Windows Paging usage. Then provide you with a set of recommendation for your PC.
  3. Repairs all kind of problems on your Windows XP PC – This is including registry fixes, driver fixes, check for security issues, and disable all kind of malicious programs on your PC.
  4. No installation required – Because Reimage used web-based ActiveX, you can run it anywhere as long as Internet Explorer is installed.
For Reimage Home Edition, it also comes with a Free PC booster which capable to speed up most common programs on your PC. Unfortunately, Reimage only available for Windows XP.
You can check out more about Reimage at Reimage blog or you can view the company video: How the technology works.

Disable or Enable Right Click on Taskbar

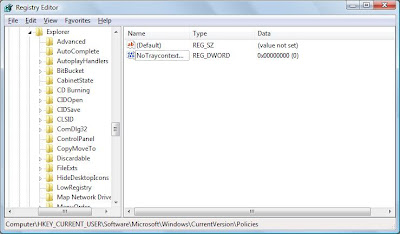
Here is trick to remove right click functionality from taskbar. You just have to do some editing in windows registry editor. It willl disable right click on all components of taskbar. Just follow given steps:


1). Go to Start -> Run -> regedit.
 
2). In registry editor window go to
HKEY_CURRENT_USER\Software\Microsoft\Windows\CurrentVersion\Explorer
 
3). Create a DWORD value and set its value name asNoTrayContextMenu.


4). Set its value data 1 or 0
 
1- For disabling right click functionality from all components of taskbar
0- For enabling right click functionality from all components of taskbar
 
5). Restart computer.
 
Its done.

Automatically Turns Off Your Speakers When You Lock Your PC

 
Windows only: Portable utility Mute on Lock turns off your system speakers whenever you walk away and lock your workstation, but it also provides a quick shortcut key for toggling your speakers on or off.


Once you've downloaded and launched the no-installation-required utility, your speakers will turn off immediately after pressing the Win+L shortcut key to lock your workstation, and then turn back on once you've unlocked your PC. If you head into the settings page, you can set up a custom shortcut key to mute or unmute the sound, or customize what the tray icon does. Definitely a handy utility for those of us that lock our workstations religiously, and it doesn't take up a lot of resources either.
Mute on Lock is a free download for any version of Windows, though readers should note that you might have to use the Windows Compatibility Mode feature set to Windows XP to get it to work properly on Windows 7.

Disable The Right Click Functionality On The Desktop

Today tip is very useful particularly for home users who want to protect their system default settings against unwanted changes that other users can make. For example changes in system desktop appearance, themes, and screen saver as well as other display settings. Using registry editor, you can disable the right click functionality on desktop to access the "Display Properties" dialog box and this will also prevent users to access windows explorer.

Follow the given steps to disable the right click functionality on desktop:
To use this feature, you will need to be logged into your computer with administrative rights.
Click Start button and type regedit in Run option then press Enter for next.


Here locate the location to:
HKEY_CURRENT_USER\Software\Microsoft\Windows\CurrentVersion\Policies\Explorer
Here in right side panel, right click to create a new DWORD value with the name NoViewContextMenu (it is case sensitive), then assign number 1 in value data box.
Now close the registry editor and restart your computer after any changes to go into effect.
But next time, if you want to enable right click functionality on desktop then simply change the value of data box or delete the NoViewContextMenu DWORD item.

Make Folder or File Without A Name

Do you know how to make a folder without a name? is it possible? Yes it is possible you can make a folder or a file without any name. Just try this

1). Click the folder or file which you want to have no name.
2). Right click on it and then click rename and delete the old name.
3). Press ALT button from your keyboard and type 0160(holding alt) after that press enter. Note that while you will type 0160 it will not appear, but continue typing and press enter.. thats it.

Its Done.
Make sure that you are using the number pad, using just the row of numbers above the qwerty doesn’t work. For a laptop, if you dnt have number pad then check and see if there’s a pseudo-numpad that uses the fn key. then you can just hold down the fn and alt at the same time while typing in 0160.

For deleting this folder you have to rename it by using command prompt. remember dont use space use alt+0160 as current file name

Disable Error Reporting in Windows

1. Open Control Panel
2. Click on Performance and Maintenance.
3. Click on System.
4. Then click on the Advanced tab
5. Click on the error-reporting button on the bottom of the windows.
6. Select Disable error reporting.
7. Click OK
8. Click OK

Delete Large Number Of Files Containing Folders in Seconds

By default  Windows takes very long time to delete large number files or folder specially when they  contain large number of files inside files, it takes time as it evaluates the size of each file before erasing it from your computer hard drive. Fast Folder Eraser is a free program which lets you delete folders with large number of files at a faster speed as compared to windows.
Fast Folder Eraser
Fast Folder Eraser can do the same much faster and the files are not sent to the recycle bin, but are deleted directly. It took 4 minutes and 50 seconds to delete a large folders structure with 118,184 files for a total size of 7,27 GB.

Key Features Of Fast Folder Eraser

  • Quickly delete folders with a large number of files
  • Statistics on the deletion process (single folder only)
  • Do not display statistics (faster deletion)
  • Reduce memory usage (slower deletion)
  • Work in background (faster deletion)
  • Exit when finished


Restarting Windows Without Restarting Your PC (Vista or XP)

Mostly Computer takes lots of time for restart. Sometimes we need to restart our computer, that time it becomes necessity like after installing some software but when we have limited time and we are busy then it is very annoying to wait for it to restart. 


So here is solution for this problem. In that case you need not to restart your computer but you can restart your windows without restarting computer. It will take very less time.


To restart windows without restarting computer you just need to hold Shift key down while clicking on shutdown or restart button.

you computer would restart without restarting the Computer.

Restart Windows without Restarting PC, this term is known as Hot Booting.

Tip To Expand Your Primary Drive To Get More Space


Your Pc  “C” drive getting  smaller for the programs you want to install? Would you like to expand your primary drive to get more space? What you need is a good partitioning program. GParted is what you need.
This nifty freeware will suit many computer users. GParted’s simple user interface makes partitioning a breeze. You select the drive from the top right corner of the program.
You can use the program to assign the hard disk space changes, conduct a final review, and click on the “Apply.” The sliders with each drive let you use your mouse to adjust the hard disk space. The changes you make start taking effect only after you click on the Apply button.
Note: Do not attempt partitioning if you are experiencing power outages – the computer turning off in the middle of the process can cause some serious hard disk problems.
GParted is primarily a program for Linux computers. But Windows 32-bit users can make use of the program as well. Linux users can check their distro’s repositories to install. Windows users can boot from an Ubuntu live CD, if they have one, and find GParted under “System” followed by “Administration.” Other Windows users can download the GParted Live CD, burn it to a disk, and boot the system from it.
The program will be a great help to anybody looking for a good hard drive partitioning program. Check out GParted.

Increase Download Speed Of Lan To Maximum


If you are experiencing  of slow downloading speed of your LAN, then try this may be this works for you. Just follow given steps to get maximum LAN speed:

1). Open Control Manager.
2). Double click on Device Manager.


3). Now window will asked for your permission to continue, just click on continue.
4). In device manager window locate network card & double click on it.
5). It will open new window, Here click on Advanced tab.
6). Now locate speed and duplex in property and then on right hand side select 100mbps half duplex.


7). Click OK.
Its Done.
Now your LAN download speed must be faster than before, Its the maximum LAN download speed.

Speed Up Your Computer by Cleaning RAM

If your computer become slow, when you are working with many programs. It may be due to RAM because at that time RAM is full of remaining progress pieces which you are working with and you do not need them any more. So, if you can erase or delete those unnecessary pieces of information, your computer RAM will be cleaned and your computer will be speed up.
 Cleaning RAM is very easy task here are steps for it, just follow them:

1). Open notepad.

2). Type FreeMem=Space(64000000).

3). Save file with name "CleanRAM.vbs".

4). Close it and run the file.

It will free memory in RAM, if you want to free more memory than you can write following command in notepad instead of what given in step 2.

FreeMem= (256000000) for 256 mb
FreeMem= (128000000) for 128 mb
FreeMem= (72000000) for 72 mb
FreeMem= (64000000) for 64 mb
FreeMem= (32000000) for 32 mb
FreeMem= (24000000) for 24 mb

Make sure that you don't select the memory that is larger than your memory capacity.

Stop The System Automatically Rebooting After Windows Updates

Normally Windows Update will automatically reboot the system when you have your system configured to "Automatically download recommended updates for my computer and install them" and one or more of those updates requires a reboot. This settings changes the behavior so when users are logged in the system will not automatically reboot.

Open your registry and find or create the key below.
Create a new DWORD value, or modify the existing value, called "NoAutoRebootWithLoggedOnUsers" and set it according to the value data below.
Exit your registry; you may need to restart or log out of Windows for the change to take effect.
Registry Editor Example
|NameTypeData|
|(Default)REG_SZ(value not set)|
|NoAutoRebootWithLoggedOnUsersREG_DWORD0x00000001 (1)|
-
|HKEY_LOCAL_MACHINE\SOFTWARE\Policies\Microsoft\Windows\Windo...|
-
Registry Settings
System Key: [HKEY_LOCAL_MACHINE\SOFTWARE\Policies\Microsoft\Windows\WindowsUpdate\AU]
Value Name: NoAutoRebootWithLoggedOnUsers
Data Type: REG_DWORD (DWORD Value)
Value Data: (0 = no effect, 1 = do not automatically reboot)
>> Recommended Download - check, repair and optimize your registry now with Registry Mechanic <<

10 Common IE Bugs and Fixes

10 common Internet Explorer bugs and solutions. This will able to help you shorten the times spent on debugging the layout inconsistensies in IE.


 http://www.queness.com/post/683/10-awful-ie-bugs-and-fixes

Use Browser As A Calculator

While surfing if you need to calculate some figure then no need to open calculator in window. You can do simple calculation easily in browser. It is done by simple javascript, which is described below. You just need to write that script in address bar and press enter. answer would display immediately in an dialog box.
javascript: alert(calculation part);
for example 
calculate 6+5 
write javascript: alert(6+5); in address bar and press enter.
answer displyed in dialog box as shown below.

calculate 6*5-2
write javascript: alert(6*5-2); in address bar and press enter.

You can use +, -, *, /, % and can perform calculation easily without open windows calculator

Byepass Capctha Word Verification

If you don't know what Captcha is ,It is an acronym for "Completely Automated Public Turing test to tell Computersand Humans Apart". Entering Captcha is very  annoying  for everyone.It used to safe from bots and Spammers .You can Bypass captcha in many waysThere are various firefox Plugins which can be used for bypass procees.Check this out

1.SkipScreen

skips unnecessary pages on sites like Rapidshare, Megaupload, zShare, Mediafire, and more. Try it out, or watch a demo at skipscreen.com.SkipScreen will be tenaciously maintained and improving all the time. Why Clickthroughad-laden pages and wait for countdowns when your computer can do it for you? 

Supported sites:
Rapidshare.com
zShare.net
MediaFire.com
Megaupload.com
 Sharebee.com
 Depositfiles.com
 Sendspace.com
 Divshare.com
 Linkbucks.com
 Uploaded.to
 Hotfiles.com
 4shared.com

many more...

Download It From here

https://addons.mozilla.org/en-US/firefox/addon/11243/

-

Twitter Delicious Facebook Digg Stumbleupon Favorites More